> ## Documentation Index
> Fetch the complete documentation index at: https://docs.peaka.com/llms.txt
> Use this file to discover all available pages before exploring further.
# Peaka as a Data Management Tool with UI
With **Peaka as a Data Management Tool with UI**, you can access all of its **premium features** through either its **powerful API** or/and its **intuitive user interface (UI)**. Whether you prefer seamless automation via the API or a more visual approach using the UI, Peaka offers the flexibility to suit your needs. If you prefer to use Peaka exclusively as a connector solution, we provide a dedicated approach for that use case. To learn more about this focused implementation, please refer to the [Peaka as a Connector-Only Solution](#peaka-as-a-connector-only-solution) section.
## Embed Peaka's UI in Your Web Application
You can easily integrate **Peaka's UI** into your own web application. This allows your users to enjoy the full range of Peaka's advanced features without ever leaving your platform. By embedding Peaka, you provide a **seamless and cohesive experience**, empowering your users with the tools they need to maximize productivity and efficiency.
***
### Key Benefits:
* Access all premium features via API or UI.
* Embed Peaka's UI directly into your web application.
* Deliver a unified experience for your users.
* Enhance productivity with Peaka's advanced tools.
***
### TLDR;
If you want to see it in action you can check our example applications that created in NextJs with Python/NodeJS backend.
[Go to Python App](https://github.com/peakacom/embedded-peaka-python-example)
[Go to Node App](https://github.com/peakacom/embedded-peaka-node-example)
[Go to Running Example](https://embedded-peaka-node-example.vercel.app/)
***
### Prerequisites
* Partner API Key: To create a Partner API Key, please refer to our guide on [managing partner API keys](https://docs.peaka.com/how-to-guides/how-to-manage-partner-api-key#how-to-manage-your-partner-api-key).
## Initiate the Session
* To begin, you need to initiate a session with Peaka using your Partner API Key as the token.
```javascript cURL theme={null}
curl --request POST \
--url https://partner.peaka.studio/api/v1/ui/initSession \
--header 'Content-Type: application/json' 'Authorization: Bearer '\
--data '{
"projectId":
}'
```
```javascript JavaScript theme={null}
const options = {
method: 'POST',
headers: {'Content-Type': 'application/json'},
body: '{"projectId":"projectId"}'
};
fetch('https://partner.peaka.studio/api/v1/ui/initSession', options)
.then(response => response.json())
.then(response => console.log(response))
.catch(err => console.error(err));
```
```python Python theme={null}
import requests
url = "https://partner.peaka.studio/api/v1/ui/initSession"
payload = {
"projectId": "projectId",
}
headers = {"Content-Type": "application/json"}
response = requests.request("POST", url, json=payload, headers=headers)
print(response.text)
```
```php PHP theme={null}
"https://partner.peaka.studio/api/v1/ui/initSession",
CURLOPT_RETURNTRANSFER => true,
CURLOPT_ENCODING => "",
CURLOPT_MAXREDIRS => 10,
CURLOPT_TIMEOUT => 30,
CURLOPT_HTTP_VERSION => CURL_HTTP_VERSION_1_1,
CURLOPT_CUSTOMREQUEST => "POST",
CURLOPT_POSTFIELDS => "{\n \"projectId\": \"projectId\" \n}",
CURLOPT_HTTPHEADER => [
"Content-Type: application/json"
],
]);
$response = curl_exec($curl);
$err = curl_error($curl);
curl_close($curl);
if ($err) {
echo "cURL Error #:" . $err;
} else {
echo $response;
}
```
```go Go theme={null}
package main
import (
"fmt"
"strings"
"net/http"
"io/ioutil"
)
func main() {
url := "https://partner.peaka.studio/api/v1/ui/initSession"
payload := strings.NewReader("{\n \"projectId\": \"projectId\" \n}")
req, _ := http.NewRequest("POST", url, payload)
req.Header.Add("Content-Type", "application/json")
res, _ := http.DefaultClient.Do(req)
defer res.Body.Close()
body, _ := ioutil.ReadAll(res.Body)
fmt.Println(res)
fmt.Println(string(body))
}
```
```java JAVA theme={null}
HttpResponse response = Unirest.post("https://partner.peaka.studio/api/v1/ui/initSession")
.header("Content-Type", "application/json")
.body("{\"projectId\": \"projectId\"}")
.asString();
```
* The endpoint will provide a URL to initiate your session.
```javascript theme={null}
{
"sessionUrl": "https://partner.peaka.studio/api/v1/ui/session?code="
"partnerOrigin": "https://.peaka.studio/"
}
```
You can access the user interface using the provided URL.
## Enabling Embedded UI for Peaka Integration Using an iframe
For security reasons, you cannot use the session URL directly in an iframe. To embed Peaka within an iframe, you need to enable the embedded UI for your partner API key.
In order to do that you should;
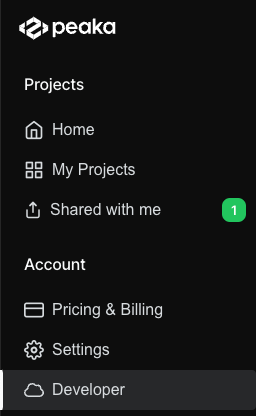
* Go to `Developer Settings` in your peaka account.
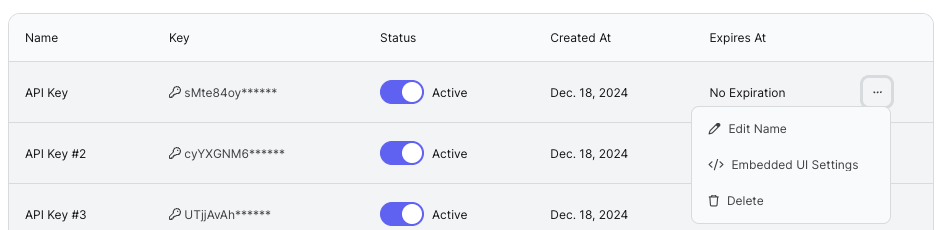
 * Find your api key in the table then click `...` button.
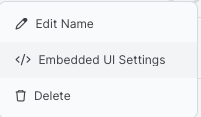
 * Select `Enable Embedded UI` option
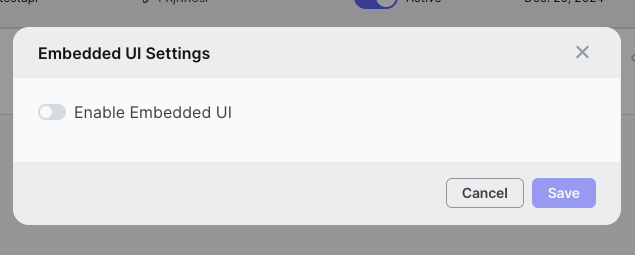
 * Enable Embedded UI for this API Key
 * Enter your domain that you want to embed the Peaka app.
 URL is needed for security reasons. Please be aware that your application
should be served over HTTPS for use in an iframe.
* Enter a Company Name for white labeling in Embedded UI.
URL is needed for security reasons. Please be aware that your application
should be served over HTTPS for use in an iframe.
* Enter a Company Name for white labeling in Embedded UI.
 * If you want to customize the UI, click "Customize UI Theme" button then give a theme name and upload your custom css file. You can also download the valid example of the customization file (Check out the related documentation [to learn more about customization](/how-to-guides/how-to-customize-embedded-ui-style)).
You can add custom css files more than one and change themes in runtime.
* If you want to customize the UI, click "Customize UI Theme" button then give a theme name and upload your custom css file. You can also download the valid example of the customization file (Check out the related documentation [to learn more about customization](/how-to-guides/how-to-customize-embedded-ui-style)).
You can add custom css files more than one and change themes in runtime.
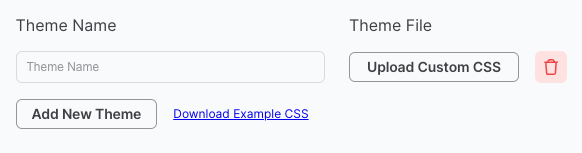 After you set the css file, you should start the session with following parameters to enable custom theme.
```json theme={null}
{
projectId:
theme: ,
themeOverride: true
}
```
Now you are ready to embed Peaka's UI into your web application using an iframe.
```html theme={null}
```
Note: The application requires clipboard access to perform copy actions. Please ensure your iframe code includes allow="clipboard-write \*" to prevent browser blocking.
Note: If you want to switch between different themes in runtime you can do it with iframe's post message method.
```javascript theme={null}
iframeElement.contentWindow.postMessage(
{
theme:
themeOverride: true,
},
partnerOrigin:
);
```
Congratulations! You have successfully embedded Peaka's UI into your web application. Your users can now seamlessly interact with Peaka's interface to manage their data efficiently and effectively.
## Hiding Parts of the Embedded UI
In **Embedded Mode**, you can customize the Peaka UI by hiding specific components or features. To do this, use the `featureFlags` key when initiating the UI session. This allows you to tailor the interface to your application’s needs, ensuring a seamless and focused user experience.
### Example:
When initializing the UI session, specify the features you want to hide or disable using the `featureFlags` configuration. This ensures that only the relevant parts of the UI are displayed to your users. For example you can hide **queries** sections in Peaka's UI with following configuration.
```javascript theme={null}
curl --request POST \
--url https://partner.peaka.studio/api/v1/ui/initSession \
--header 'Content-Type: application/json' 'Authorization: Bearer '\
--data '{
"projectId":
"theme": ,
"themeOverride": true,
"featureFlags": {
"queries": false,
}
}'
```
For more details, refer to the [Embedded API Reference](https://docs.peaka.com/api-reference/embedded-peaka-api/init-session).
## Peaka as a Connector-Only Solution
When you need to use Peaka exclusively as a connector solution, you can configure the UI session to display only the connector functionality. This streamlined approach is perfect for applications that focus on data source connections without requiring the full Peaka studio experience.
First, initialize the session with following payload options:
```javascript theme={null}
curl --request POST \
--url https://partner.peaka.studio/api/v1/ui/initSession \
--header 'Content-Type: application/json' 'Authorization: Bearer '\
--data '{
"projectId":
"theme": ,
"themeOverride": true,
"sessionMode": <"CONNECTOR_MODAL_ONLY" | "FULL_STUDIO">,
"connectorType": ,
"catalogCreateEnabled": true,
}'
```
### Configuration Options:
**SessionMode**: Specifies the mode of the session. Available options are:
**ConnectorType**: Specifies the type of connector interface to display. Available options can be found in the [API Reference](https://docs.peaka.com/api-reference/embedded-peaka-api/init-session#body-feature-configs).
**CatalogCreateEnabled**: Boolean flag that controls whether catalogs are automatically created when establishing connections. The default value is `true`. Set this to `false` only when using `CONNECTOR_MODAL_ONLY` mode to prevent automatic catalog creation.
* `CONNECTOR_MODAL_ONLY`
* `FULL_STUDIO`
Note: **ConnectorType** and **CatalogCreateEnabled** are only available in the `CONNECTOR_MODAL_ONLY` mode.
### Example:
The API response includes `sessionUrl` and `partnerOrigin` properties, allowing you to open the Peaka interface in a popup window for seamless integration.
In this example, we're using the `CONNECTOR_MODAL_ONLY` mode to display only the connector modal interface. We get the session URL and partner origin from the API response and open the Peaka interface in a popup window.
```javascript theme={null}
fetch(`https://partner.peaka.studio/api/v1/ui/initSession`, {
method: "POST",
headers: {
"Content-Type": "application/json",
"Authorization": "Bearer "
},
body: JSON.stringify({
projectId: ,
theme: ,
themeOverride: true,
sessionMode: "CONNECTOR_MODAL_ONLY",
connectorType: ,
catalogCreateEnabled: true,
}),
}).then(async (response) => {
const res = await response.json();
// Open the Peaka connector interface in a popup window
window.open(
res.sessionUrl,
"authPopup",
`width=500,height=600,left=${window.screen.width / 2 - 500 / 2},top=${
window.screen.height / 2 - 600 / 2
},resizable=yes,scrollbars=yes,noopener=no,noreferrer=no`
);
// Handle the message from the Peaka connector popup
const handleMessage = (event) => {
// Use event.data to get the message from the Peaka connector popup when popup is closed
if (event.data.status) {
// Status might be "CANCELLED" or "FINISHED"
// If popup is closed without selection a catalog, status will be "CANCELLED"
// If popup is closed with selection a catalog, status will be "FINISHED"
console.log("Status from the Peaka connector popup:", event.data.status);
window.removeEventListener("message", handleMessage);
} else {
console.log("Data from the Peaka connector popup:", event.data);
}
};
// Listen to the message from the Peaka connector popup when popup is closed
window.addEventListener("message", handleMessage);
});
```
### Troubleshooting
If you are having trouble with having status from the connector popup, follow these steps to troubleshoot the issue:
* Check if you have enabled Embedded UI Settings for your API Key.
* Add your domain that you want to embed the Peaka app to the Embedded UI Settings in the Developer Settings.
After you set the css file, you should start the session with following parameters to enable custom theme.
```json theme={null}
{
projectId:
theme: ,
themeOverride: true
}
```
Now you are ready to embed Peaka's UI into your web application using an iframe.
```html theme={null}
```
Note: The application requires clipboard access to perform copy actions. Please ensure your iframe code includes allow="clipboard-write \*" to prevent browser blocking.
Note: If you want to switch between different themes in runtime you can do it with iframe's post message method.
```javascript theme={null}
iframeElement.contentWindow.postMessage(
{
theme:
themeOverride: true,
},
partnerOrigin:
);
```
Congratulations! You have successfully embedded Peaka's UI into your web application. Your users can now seamlessly interact with Peaka's interface to manage their data efficiently and effectively.
## Hiding Parts of the Embedded UI
In **Embedded Mode**, you can customize the Peaka UI by hiding specific components or features. To do this, use the `featureFlags` key when initiating the UI session. This allows you to tailor the interface to your application’s needs, ensuring a seamless and focused user experience.
### Example:
When initializing the UI session, specify the features you want to hide or disable using the `featureFlags` configuration. This ensures that only the relevant parts of the UI are displayed to your users. For example you can hide **queries** sections in Peaka's UI with following configuration.
```javascript theme={null}
curl --request POST \
--url https://partner.peaka.studio/api/v1/ui/initSession \
--header 'Content-Type: application/json' 'Authorization: Bearer '\
--data '{
"projectId":
"theme": ,
"themeOverride": true,
"featureFlags": {
"queries": false,
}
}'
```
For more details, refer to the [Embedded API Reference](https://docs.peaka.com/api-reference/embedded-peaka-api/init-session).
## Peaka as a Connector-Only Solution
When you need to use Peaka exclusively as a connector solution, you can configure the UI session to display only the connector functionality. This streamlined approach is perfect for applications that focus on data source connections without requiring the full Peaka studio experience.
First, initialize the session with following payload options:
```javascript theme={null}
curl --request POST \
--url https://partner.peaka.studio/api/v1/ui/initSession \
--header 'Content-Type: application/json' 'Authorization: Bearer '\
--data '{
"projectId":
"theme": ,
"themeOverride": true,
"sessionMode": <"CONNECTOR_MODAL_ONLY" | "FULL_STUDIO">,
"connectorType": ,
"catalogCreateEnabled": true,
}'
```
### Configuration Options:
**SessionMode**: Specifies the mode of the session. Available options are:
**ConnectorType**: Specifies the type of connector interface to display. Available options can be found in the [API Reference](https://docs.peaka.com/api-reference/embedded-peaka-api/init-session#body-feature-configs).
**CatalogCreateEnabled**: Boolean flag that controls whether catalogs are automatically created when establishing connections. The default value is `true`. Set this to `false` only when using `CONNECTOR_MODAL_ONLY` mode to prevent automatic catalog creation.
* `CONNECTOR_MODAL_ONLY`
* `FULL_STUDIO`
Note: **ConnectorType** and **CatalogCreateEnabled** are only available in the `CONNECTOR_MODAL_ONLY` mode.
### Example:
The API response includes `sessionUrl` and `partnerOrigin` properties, allowing you to open the Peaka interface in a popup window for seamless integration.
In this example, we're using the `CONNECTOR_MODAL_ONLY` mode to display only the connector modal interface. We get the session URL and partner origin from the API response and open the Peaka interface in a popup window.
```javascript theme={null}
fetch(`https://partner.peaka.studio/api/v1/ui/initSession`, {
method: "POST",
headers: {
"Content-Type": "application/json",
"Authorization": "Bearer "
},
body: JSON.stringify({
projectId: ,
theme: ,
themeOverride: true,
sessionMode: "CONNECTOR_MODAL_ONLY",
connectorType: ,
catalogCreateEnabled: true,
}),
}).then(async (response) => {
const res = await response.json();
// Open the Peaka connector interface in a popup window
window.open(
res.sessionUrl,
"authPopup",
`width=500,height=600,left=${window.screen.width / 2 - 500 / 2},top=${
window.screen.height / 2 - 600 / 2
},resizable=yes,scrollbars=yes,noopener=no,noreferrer=no`
);
// Handle the message from the Peaka connector popup
const handleMessage = (event) => {
// Use event.data to get the message from the Peaka connector popup when popup is closed
if (event.data.status) {
// Status might be "CANCELLED" or "FINISHED"
// If popup is closed without selection a catalog, status will be "CANCELLED"
// If popup is closed with selection a catalog, status will be "FINISHED"
console.log("Status from the Peaka connector popup:", event.data.status);
window.removeEventListener("message", handleMessage);
} else {
console.log("Data from the Peaka connector popup:", event.data);
}
};
// Listen to the message from the Peaka connector popup when popup is closed
window.addEventListener("message", handleMessage);
});
```
### Troubleshooting
If you are having trouble with having status from the connector popup, follow these steps to troubleshoot the issue:
* Check if you have enabled Embedded UI Settings for your API Key.
* Add your domain that you want to embed the Peaka app to the Embedded UI Settings in the Developer Settings.